
The RDMS credential rests on two connected exams: Sonography Principles and Instrumentation, plus a specialty exam such as Abdomen or Obstetrics and Gynecology under the ARDMS framework. The habit worth building early is separating what the machine does from what the image means. When a finding appears, ask whether it survives a control change. This guide walks through that reasoning with artifact and Doppler scenarios, a decision table, and a self-check rubric you can reuse weekly.
How the SPI and Specialty Exam Structure Shapes Your Plan
The RDMS pathway pairs the Sonography Principles and Instrumentation exam with one specialty exam, such as Abdomen or Obstetrics and Gynecology, so plan preparation as two linked tracks with different skills.
Track one is physics and instrumentation: how sound interacts with tissue and how each control changes the displayed image. Track two is clinical: recognizing normal and abnormal anatomy in your chosen specialty, performing measurements in standard planes, and describing findings. The ARDMS exam catalog lists the available specialties separately from SPI, which reflects this split. Studying the tracks together blurs them; studying them as separate passes over the same machine lets each reinforce the other.
Sequence matters. If you build a solid physics base first, specialty content becomes easier because every artifact, Doppler display, and measurement decision reuses the same underlying concepts. Choose your specialty early, since it determines which case types you drill. One practical note: application steps, eligibility rules, fees, and scheduling details are administrative matters that change over time, so confirm them directly on the ARDMS get-certified page rather than relying on study materials or secondhand accounts.
Knob Knowledge vs. Image Judgment: Why You Need Both Separately
Gain amplifies echoes the machine has already received; output power changes the energy transmitted into the patient. Confusing these two is a physics error with a direct imaging consequence.
Overall gain and time-gain compensation adjust the brightness of returning echoes after reception; they make the image look brighter or darker without changing anything sent into tissue. Output power (transmit power) changes the acoustic energy entering the patient, which is why it relates to the on-screen thermal index. A dark deep-abdominal image invites a knee-jerk gain increase. Trace the example: raising overall gain brightens noise along with true echoes, so penetration does not actually improve.
The better decision sequence is mechanical: set depth and focal zone appropriately for the region, consider changing the transducer or acoustic window to shorten the sound path, then adjust output within safe limits, and only use gain to refine displayed brightness. Practice stating the chain out loud for each control you touch: what changed, what it affects physically, and what you expect to see. That sentence format doubles as a reusable framework for instrumentation questions that ask what a control does and does not do.
Explore in 3D: Liver and Gallbladder
Locate the gallbladder on the inferior surface of the liver, then inspect the included bile duct. The liver and gallbladder are accessory digestive organs outside the food passage.
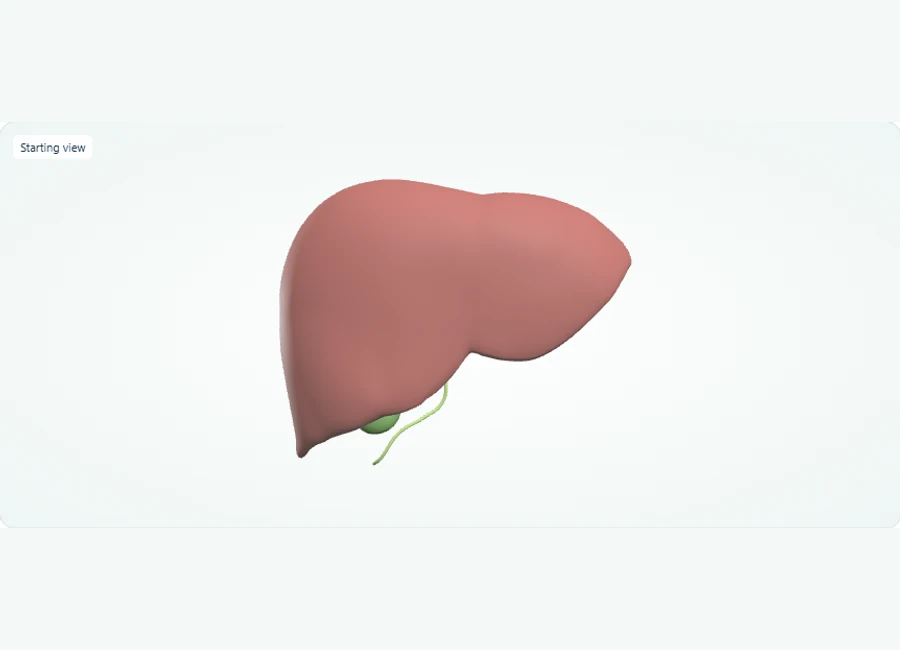
Rotate, isolate structures, and test your recall.
Rotate below the liver to find the gallbladder on its inferior surface.
Select the gallbladder and isolate it to inspect its shape. Use Show all before comparing its position with the liver.
Select and hide the liver, then select the bile duct to inspect its course. Complete hepatic and cystic duct junctions are not separately represented.
Try it yourself
Which accessory digestive organ lies on the inferior surface of the liver?
Show answer and explanation
Gallbladder
The gallbladder sits on the inferior (underside) surface of the liver and stores bile; bile leaves via the bile duct shown in this model.
- The gallbladder lies on the inferior surface of the liver.
- The liver and gallbladder are accessory organs — they are outside the food passage.
- The bile duct is included on this model, but the junctions between hepatic and cystic ducts are not shown or separately labelled.
Explore in 3D: Kidneys, Ureters and Bladder: The Urine Transport Pathway
This model shows five selectable structures: the right and left kidneys, the right and left ureters, and the urinary bladder. It demonstrates the gross pathway of urine transport from where urine forms (kidneys) to where it is stored (bladder). Note: the urethra and internal renal anatomy are not included in this model, so the pathway ends at the bladder.
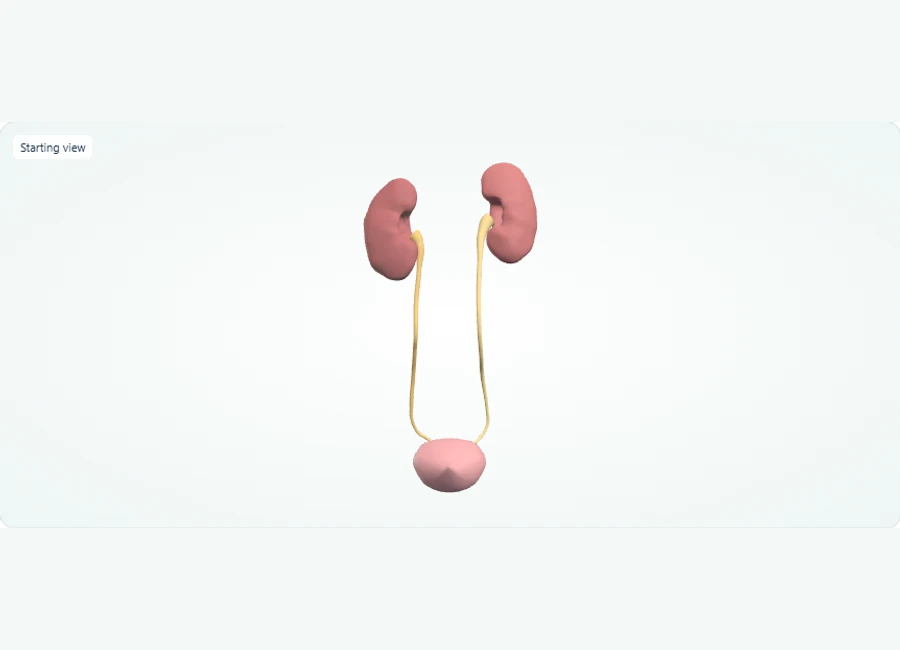
Rotate, isolate structures, and test your recall.
Choose Front. Select the right kidney, then its ureter, and follow the route toward the bladder with all structures visible.
Repeat on the left side. Select and hide each kidney separately if you want a clearer view of the ureters; use Show all to restore them.
Select the urinary bladder. Rotate the model and identify where the paired ureters meet the single bladder.
Try it yourself
Trace the three structures in the right-sided urine transport route shown here. What does the final structure do?
Show answer and explanation
Right kidney, right ureter, urinary bladder. The bladder stores urine until it leaves the body. (The left side follows the same pattern: left kidney and left ureter also deliver urine to the bladder.)
Urine flows from each kidney into its own ureter, which transports it down to the urinary bladder for storage. Both the right and left ureters empty into the single bladder. Because the urethra is absent from this model, the bladder is the terminal structure you can trace.
- Urine is formed in the kidneys; from each kidney, urine drains into that side's ureter (right ureter from right kidney, left ureter from left kidney).
- Each ureter carries urine downward to the urinary bladder, which stores urine until it is expelled; this model shows both ureters joining the bladder.
- This model is a gross transport overview only: the urethra and internal kidney structures are not shown, so urine flow beyond the bladder cannot be traced here.
Explore in 3D: Stomach, Pancreas and Duodenum: Spatial Relationships
Study the three selectable organs in this model — stomach, duodenum and pancreas — focusing on how they sit relative to one another: the duodenum follows the stomach, the pancreatic head lies in the duodenal curve, and the pancreas lies posterior to the stomach.
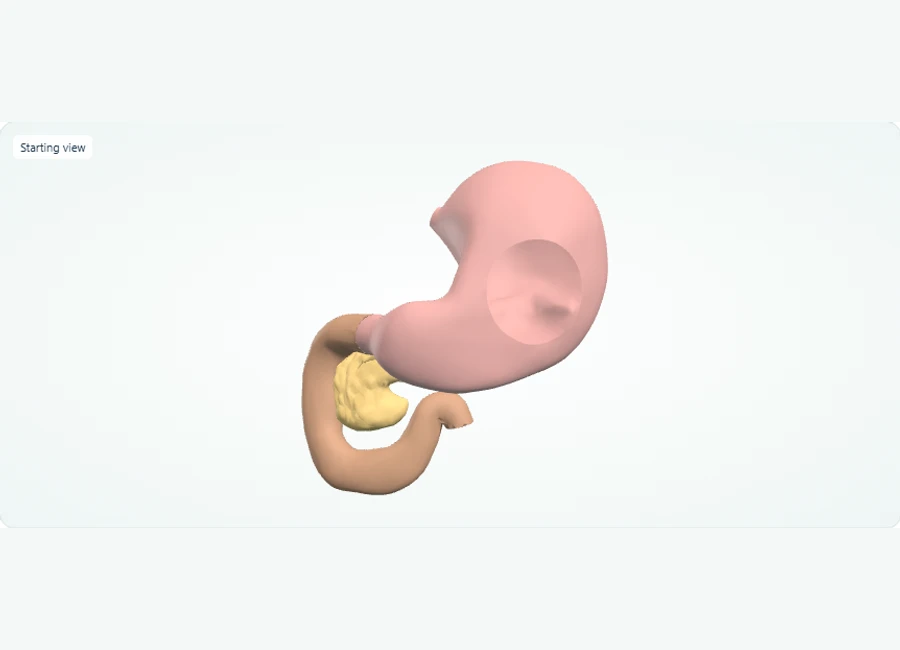
Rotate, isolate structures, and test your recall.
Rotate to the front view and zoom in to see the stomach and the duodenum continuing after it.
Select the duodenum and trace its curve, noting that the pancreatic head sits within that curve.
Use 'Hide selected' on the stomach so the pancreas, lying posterior to the stomach, is fully visible; then use 'Show all' to restore the view.
Try it yourself
Which organ has its head within the duodenal curve and lies posterior to the stomach?
Show answer and explanation
The pancreas.
After the stomach comes the duodenum, and the head of the pancreas lies within the duodenal curve; the pancreas also sits posterior to the stomach, so it is best inspected after hiding the stomach.
- The duodenum follows the stomach in the digestive pathway.
- The head of the pancreas lies in the curve of the duodenum.
- The pancreas lies posterior to the stomach, so hiding the stomach improves its exposure in this model.
Visual anatomy review: Follow the digestive route and accessory organs
Locate the gallbladder before reviewing how preparation affects its examination.
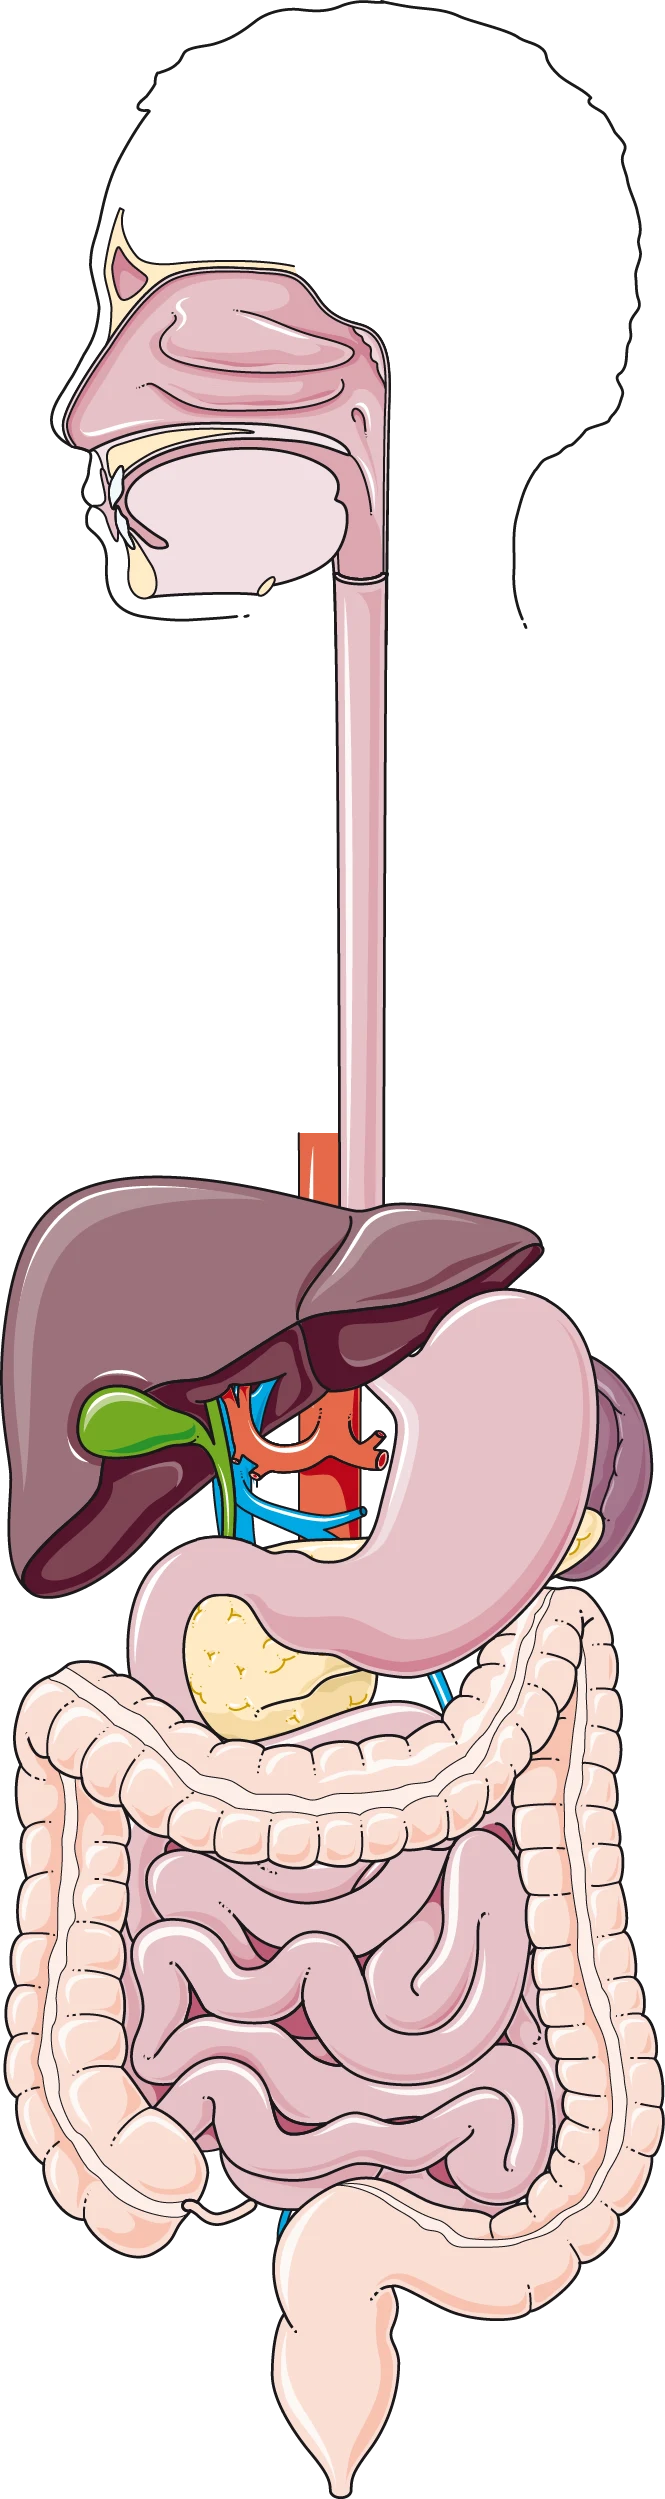
The digestive tract is a continuous passage; the liver, gallbladder and pancreas are accessory organs. Open the full-size illustration for the smaller abdominal structures.
Trace the esophagus into the stomach and then the small intestine. The duodenum comes first, followed by the jejunum and ileum. The gallbladder lies beneath the liver; it is not part of the passage through which food travels.
In Z-Anatomy, locate the stomach, duodenum, liver and gallbladder. Rotate the visceral structures to inspect their relationships, then describe the food passage without including the accessory organs in it.
Try it yourself
An upper endoscope passes through the esophagus and stomach. Which small-intestinal segment does it reach first, and is the gallbladder part of that route?
Show answer and explanation
It reaches the duodenum first. The gallbladder is an accessory organ outside that food passage.
Separate the route of access from the target of a procedure. The diagram supports location recall; the actual operative findings and work performed determine the procedure being described.
Worked Scenario: Mirror Image Artifact or True Mass?
A duplication of a structure across a strong reflector is the signature of a mirror image artifact. The scenario below shows how confirmation beats pattern recognition.
Scenario: scanning the upper abdomen, you see a rounded lesion near the liver dome, and a second similar rounded structure on the opposite side of the diaphragm. The plausible mistake is reporting two findings and recommending follow-up for the second. The mirror image mechanism explains the picture: echoes from the real lesion reflect off the strongly reflective diaphragm-lung interface and return late, so the machine places a duplicate equidistant beyond the reflector. The duplicate sits in tissue the beam never genuinely imaged, here the expected lung base.
The better decision is to test the geometry before interpreting. Confirm the two structures are roughly equidistant from the bright reflector, with the real lesion between the transducer and the reflector. Change your transducer position or angle slightly: a mirror artifact shifts, distorts, or disappears with the geometry, while a true structure stays anchored to its anatomy. Applying this matters because a duplicated finding drives unnecessary imaging and follow-up for the patient, and the same confirm-by-maneuver logic transfers to reverberation and refraction questions on the instrumentation exam.
Worked Scenario: Doppler Aliasing or Real Flow Reversal?
Aliasing is a display-scale problem, not a physiological one. Recognizing wraparound as a sampling limit changes both the diagnosis and the control you reach for.
Scenario: on color Doppler of a vessel, the color reverses abruptly from red to blue past a certain point, and the spectral trace folds over, showing peaks wrapping below the baseline. The plausible mistake is labeling this bidirectional flow or turbulence and describing pathology. The mechanism is a sampling limit: when the frequency shift exceeds the scale the system can display, the excess wraps around. Nothing about the blood's direction or velocity changed; only the display's range did.
The better decision is to raise the velocity scale (pulse repetition frequency), shift the baseline, or use a lower-frequency transmit setting, then reassess before interpreting. Real flow reversal, by contrast, persists across scale changes and occupies genuine time in the cardiac cycle on the spectral trace. The distinction matters because aliasing that goes unrecognized produces a wrong velocity measurement and a wrong flow description; resolving it first is also the reasoning pattern behind instrumentation questions about pulse repetition frequency and scale interactions.
Shadowing, Enhancement, and Through-Transmission Decisions
Distal brightness changes are physical consequences of attenuation, not automatic evidence of pathology. Classify the finding, find its cause, then interpret.
Clean posterior acoustic shadowing follows a strongly attenuating object such as a calcification, gas, or a dense fibroid, because echoes from beyond it are weak or lost. Refractive or edge shadowing appears at the curved edge of a rounded structure, where beam refraction diverts sound rather than absorbing it. Posterior enhancement is the opposite: brightness distal to a weakly attenuating, often fluid-filled structure, because fewer echoes were lost on the way through. Each has a distinct signature and a distinct confirmation move.
The confirmation habit is repositioning. Edge shadowing moves with the curve of the structure when you change your approach; a shadow from a stone stays fixed to the stone. Enhancement tells you about the intervening medium, so check whether a fluid-filled structure lies in the beam path before calling distal brightness abnormal. Use the table to drill the distinctions until classification is immediate.
- Trace every distal brightness change back to a cause before describing it in a report.
| Finding | Typical cause | Distal appearance | How to distinguish it |
|---|---|---|---|
| Posterior acoustic shadowing | Strong attenuator: calcification, gas, dense fibroid | Dark band distal to the object | Stays fixed to the object when you reposition |
| Edge (refractive) shadowing | Beam refraction at a curved boundary | Narrow dark stripe at the structure's edge | Shifts or vanishes with the angle of approach |
| Posterior enhancement | Weakly attenuating medium, usually fluid | Brighter tissue distal to the structure | Expect it behind confirmed fluid; verify the fluid first |
| Reverberation / ring-down | Repeated reflections between interfaces | Equally spaced bright lines or comet-tail | Lines are evenly spaced and move with transducer position |
Documentation, Safety Indices, and Professional Standards
Exams assess professional behavior through scenarios about on-screen indices, measurement discipline, and documentation, so treat these as content, not afterthoughts.
Thermal index and mechanical index are displayed to help the operator keep exposure as low as reasonably achievable, and they move with output power decisions rather than gain. Practically, that means output changes deserve the same reasoning as any other control: is more transmit energy justified by the diagnostic need? Scenario thinking helps: a long exam of a fluid-filled structure deserves a lower output setting than a brief survey through a thick abdominal wall, and you should be able to explain which on-screen number reflects that.
Documentation discipline is its own knowledge area: correct patient identification, labeled scan planes, consistent measurement placement, and annotations that match the image. A plausible mistake in a case-style question is measuring along an oblique plane and recording it as a standard plane; the better decision is recognizing the plane is not standard and re-acquiring. This matters because measurement conventions drive how follow-up clinicians interpret change over time, and the ARDMS compliance framework treats scope-of-practice and exam-related conduct as part of certification, not separately from it.
An Adaptable Preparation Sequence with Readiness Checks
Run a four-cycle sequence: map your specialty's content areas, drill physics controls hands-on, practice artifact and Doppler classification, then mix everything under time pressure.
Cycle one, roughly a week: take your specialty's topic areas and honestly mark each as fluent, shaky, or untaught, then spend time only on the last two. Cycle two: return to instrumentation and, in a supervised lab or on saved images, change one control at a time and state the expected effect before touching it. Cycle three: work artifact and Doppler classifications using the table above, requiring yourself to name the mechanism and the confirmation maneuver, never just the label. Cycle four: mix timed question sets from both tracks and review every miss by tracing which decision step failed.
Use this self-check rubric as a learning milestone, not a pass prediction. You are ready to move on when you can: state the gain-versus-output distinction in one sentence without notes; classify five saved artifact images with a named mechanism and a confirmation move; resolve an aliased spectral display and identify which control you changed; and identify whether a given measurement plane is standard for your specialty. If any item wobbles, cycle back rather than accumulating new content on an unstable base.
- Cycle 1: map specialty topic areas and target only weak ones.
- Cycle 2: one-control-at-a-time experiments with spoken predictions.
- Cycle 3: artifact and Doppler classification requiring mechanism plus confirmation.
- Cycle 4: mixed timed sets with misses traced to a specific decision step.
References and further reading
Use these references to explore the concepts and check the latest information from the relevant organizations.
Continue your preparation
5 practice options available