
Study the PBT domain by learning why each collection rule exists. Once you can explain what every additive does to a specimen and how collection variables distort results, the standard sequences, site-selection choices, and rejection decisions all become reconstructible through reasoning rather than memorization.
Order of Draw: Deriving the Sequence Instead of Memorizing It
The tube-drawing sequence exists to prevent additive carryover between tubes. Learn each additive's contamination effect, and the sequence becomes a logical chain you can reconstruct and justify under exam pressure.
Carryover means a trace of one tube's additive or cells transfers into the next tube on the needle's path. EDTA carried into a later tube can falsely depress calcium results and distort potassium readings; citrate carried forward can interfere with clotting measurements; tissue-factor or cell contamination can alter serum specimens. The widely taught sequence — sterile and blood culture tubes first, then citrate, then serum and separator tubes, then heparin, then EDTA, then fluoride tubes — follows from placing the most contamination-sensitive tubes earliest and chemically similar tubes adjacent.
Practice this by reconstruction, not repetition. On a blank sheet, write the sequence, then under each position write one sentence naming the carryover risk that position prevents. If you cannot fill in the sentence, go back to the additive, not the order. Note that special tubes, such as blood culture bottles, carry their own placement and mixing instructions; confirm those specifics in your current training materials rather than assuming a single universal list covers every container you will meet.
Tube Additives Compared: Matching the Additive to the Test
Each tube's additive changes the specimen chemically before analysis. Matching additive to intended test — and knowing the failure mode of the wrong match — is core domain knowledge for this credential.
Work through the table below by mechanism. EDTA binds calcium so blood cannot clot, preserving whole cells for hematology; citrate also binds calcium but in a reversible, controlled ratio suited to coagulation testing; heparin interferes with thrombin formation for plasma chemistry; fluoride blocks glycolysis so glucose is not consumed while the specimen waits; serum tubes contain no anticoagulant, so the blood clots and the cell-free fluid is tested. When you can state the mechanism, the pairing questions answer themselves.
Connect each additive to its handling requirements. Anticoagulant tubes must be mixed adequately to prevent microclots that render a specimen unusable; inversion counts vary by tube type and manufacturer, so verify the specific counts in your own course materials rather than relying on memory of a single number. A clotted anticoagulant tube and an under-mixed citrate tube are classic specimen-condition problems: the collection was technically successful but the specimen cannot serve its purpose, which is precisely the kind of outcome a decision-style question probes.
| Additive | How it acts | Typical purpose | Consequence if misapplied |
|---|---|---|---|
| EDTA | Chelates calcium to prevent clotting | Hematology on whole blood (e.g., cell counts) | Carryover into another tube distorts calcium and potassium; microclots ruin cell counts |
| Sodium citrate | Binds calcium reversibly in a fixed ratio | Coagulation testing | Wrong fill volume upsets the ratio and invalidates clotting results |
| Heparin | Inhibits thrombin formation | Plasma chemistry testing | Can interfere with some assays; not suitable when clotting studies are needed |
| Fluoride (often with oxalate) | Inhibits glycolysis to preserve glucose | Glucose and related determinations | Without it, glucose falls as cells consume it before analysis |
| Serum (clot activator, often gel separator) | No anticoagulant; blood clots and is centrifuged | Serum chemistry and serology | Insufficient clotting time or mixing can produce fibrin strands and analyzer problems |
Illustrated practice: Venous Return and Pulmonary Circulation
Lets the learner trace venous return through the visible vena cavae, right atrium, right ventricle, and pulmonary artery to confirm the pulmonary circulation sequence.
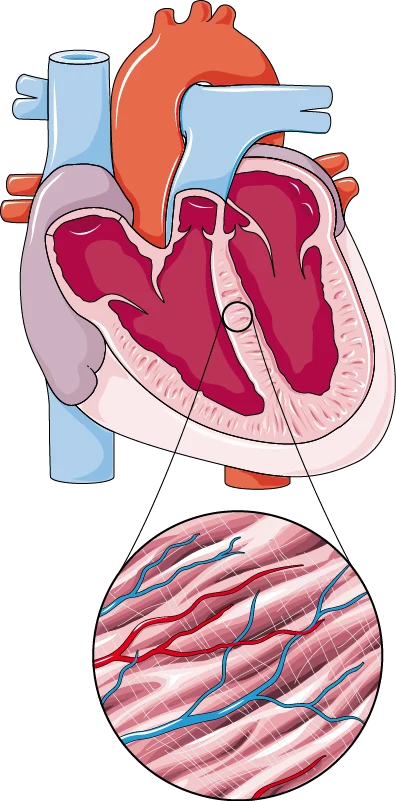
Anatomical study exhibit for the worked question below. Open the full-size view to inspect the structures.
Use the anatomical exhibit to work through the example. Choose an answer before opening the explanation.
Try it yourself
A newly hired phlebotomist asks why blood from an antecubital vein appears dark red, while blood from an accidental arterial puncture appeared bright red and pulsed in the tube. Use the normal heart cutaway to trace the returning blood through the chambers and great vessels. Which sequence correctly takes venous blood toward the lungs for reoxygenation? A. Forearm veins to the vena cava, into the right atrium, into the right ventricle, out through the pulmonary artery to the lungs. B. Forearm veins to the vena cava, into the right ventricle, into the right atrium, out through the pulmonary vein to the lungs. C. Forearm veins into the pulmonary artery, into the left atrium, into the left ventricle, out through the aorta to the lungs. D. Forearm veins to the vena cava, into the left atrium, into the left ventricle, out through the pulmonary artery to the lungs.
Show answer and explanation
A. Forearm veins to the vena cava, into the right atrium, into the right ventricle, out through the pulmonary artery to the lungs.
Venous blood returns from the upper limb through the superior vena cava to the right atrium, crosses the tricuspid valve into the right ventricle, and leaves through the pulmonary trunk and pulmonary arteries toward the lungs. Trace these connections on the viewer’s left side of the heart cutaway. Choice B reverses the right atrium and ventricle and incorrectly uses a pulmonary vein for flow toward the lungs. Choices C and D incorrectly route returning systemic venous blood through the left heart before reaching the lungs.
Pre-Analytical Variables: A STAT Potassium and a Tourniquet Left On
Pre-analytical variables alter results before any analyzer runs. In this scenario, a prolonged tourniquet plus fist pumping during a potassium draw risks a falsely elevated result that could drive wrong treatment.
Scenario: a collector applies the tourniquet while searching for a vein on a difficult patient, and two minutes pass. Asked to 'pump your fist to help the vein,' the patient squeezes repeatedly. The collector then draws a green-top tube for a STAT potassium. The plausible mistake is proceeding as usual: hemoconcentration concentrates analytes in the plasma, and muscle activity and venous stasis are recognized sources of falsely elevated potassium in training materials. The result may look alarmingly high.
The better decision is procedural: limit tourniquet time, release it once blood flow is established where your technique permits, ask the patient to open the fist after needle entry, and flag the difficult collection on the requisition so the result is interpreted with that context. Distinguish the two mechanisms here: hemoconcentration shifts plasma water and concentrates dissolved analytes, while hemolysis ruptures cells and releases intracellular potassium directly. Both elevate potassium; the prevention differs, and this is a distinction that is easy to lose when a scenario changes one variable — for example, swapping a green-top potassium draw for a serum glucose draw changes which mechanism matters most.
Site-Selection Conflicts: Mastectomy History and a Running IV
When the requisition, the patient's history, and available sites conflict, the technician's decision protects both the patient and the specimen — and every deviation from the request must be documented.
Scenario: the requisition reads 'draw left arm.' On arrival, the patient reports a previous left-sided mastectomy, and the only accessible vein on the right has an intravenous line running above it. The plausible mistake is either following the paperwork literally — collecting from the mastectomy side — or reasoning that drawing below the IV 'just this once' is acceptable. Both choices trade a documented convenience for real risk: collection on a mastectomy side is avoided because of lymphedema concerns, and IV fluid can dilute or contaminate a specimen drawn from the same limb.
The better decision is to select an acceptable venipuncture site on the non-mastectomy side away from the IV line, such as a site your training identifies as an alternative when standard arms are unavailable, notify the ordering party of the change, and record the reason for the deviation. This scenario matters because it combines three named concepts — contraindicated sites, specimen integrity, and documentation of exceptions. A study habit worth building is to check each of your scenario answers for all three layers: the site chosen, the specimen quality protected, and the paper trail left behind.
Capillary Collection: Where the Venous Rules Change
Dermal puncture follows its own logic: different specimen-volume limits, modified ordering considerations, and technique details such as site warming and wiping the first drop of blood.
Capillary specimens mix venous blood with interstitial fluid and some tissue factors from the puncture itself, which is why several venous rules do not transfer directly. The order of draw for capillary collection differs from venipuncture because microclots form faster and tube surfaces matter differently; your curriculum's published capillary sequence is the one to learn for those items. Site selection also changes: warm, well-perfused sites are preferred, while cold, cyanotic, swollen, or previously punctured sites are avoided because perfusion and tissue fluid distort the sample.
Technique details carry consequences. Squeezing or 'milking' the puncture forces tissue fluid into the blood and can hemolyze cells, skewing potassium and other cellular analytes; the first drop is commonly wiped away for the same reason. Build a two-column comparison — venous versus capillary — covering order, site rules, volume limits, and typical use cases such as pediatric or fragile-vein patients. The differences between the columns are the conceptually fragile spots: they are exactly where a venous habit applied unchanged produces a wrong answer, so spend your review time there.
Documentation and Specimen Rejection: A Self-Check Exercise
A large share of PBT practice is traceability: verifying identity, recording deviations, and recognizing unusable specimens. Run this exercise to test your reasoning chains, not just your recall of lists.
Exercise, about thirty minutes. First, write the venous order of draw from memory for five tube types and, under each position, write the carryover risk it prevents. Second, write three original one-line scenarios — for example, a tourniquet issue, a site conflict, and an additive mismatch — and for each, state the analytical consequence of the plausible mistake. Third, practice a two-identifier verification out loud using a labeled requisition, simulating the moment after you have walked away from the bed and returned to label tubes.
Expected observations and rubric. If you justify all five order positions with correct mechanisms and your three scenario consequences match the mechanisms in this guide, treat that as a milestone of conceptual readiness; two or fewer correct justifications means return to the additive table before drilling further. You should also notice whether your scenario consequences cite a mechanism ('EDTA chelates calcium') or a rule ('EDTA comes late'). Mechanism-based answers are the durable ones; rule-based answers are the ones a changed variable will break.
- Milestone 1: five of five order-of-draw positions justified by the carryover risk each prevents
- Milestone 2: three of three original scenarios answered with a named mechanism, not a memorized rule
- Milestone 3: two-identifier verification performed aloud without prompting, including the returned-after-walking-away step
- If you miss a milestone, rebuild from the additive mechanism table rather than repeating the drill
A Three-Pass Preparation Sequence and Concrete Readiness Checks
Prepare in three passes: mechanisms first, scenario decisions second, mixed timed review last. Consider yourself ready when you can justify every rule aloud, not merely recite the sequence from memory.
Pass one, roughly the first third of your available time: master additive mechanisms, the order of draw, and capillary-versus-venous differences using flashcards that ask 'what does this additive do' rather than 'which tube is this.' Pass two: convert every fact into a decision by writing your own error scenarios and consequences, then compare them with practice items on the free PBT practice page and the broader collection on the study guides index. Pass three: run mixed sets where tube, site, and documentation questions alternate, forcing you to switch decision types quickly.
For administrative matters — eligibility, scheduling, and current credential requirements for the PBT credential — consult the issuer directly through the ASCP Board of Certification pages linked below, since those details change and are not covered here. Finish your preparation with the readiness checks below, and treat your results on them as learning milestones rather than predictions of any particular result.
- Readiness check 1: state the analytical consequence of each common additive mistake without consulting notes
- Readiness check 2: resolve a conflicting site-selection case (mastectomy history plus IV access) and describe the documentation you would write
- Readiness check 3: explain the difference between hemoconcentration and hemolysis using a potassium example for each
- Readiness check 4: reconstruct the order of draw from mechanisms in under two minutes, capillary and venous versions
- Readiness check 5: on mixed practice sets, classify each miss as a mechanism gap or a recall gap before the next attempt
References and further reading
Use these references to explore the concepts and check the latest information from the relevant organizations.