
Study this credential by practicing a fixed specimen decision sequence — orient, ink, measure, sample, dictate — and by training yourself to describe findings without interpreting them. Work through margin and autopsy paper scenarios, score your plans against a rubric, and organize review by body system so anatomy and specimen handling reinforce each other.
Describing Versus Interpreting: Keeping Gross Findings Objective
Objective description — recording only what you can observe and measure, without crossing into diagnosis — is the defining discipline of the pathologists' assistant role, and every scenario in this guide exercises that discipline.
The scope split is the foundation. A pathologists' assistant performs the gross examination, selects and submits sections, and assists with autopsies under supervision, while the pathologist examines slides and renders the diagnosis. Descriptive gross language therefore records only what you can observe and measure: dimensions, weight, color, consistency, lesion location relative to named landmarks, and the state of each inked surface. Phrases such as 'consistent with' or 'diagnostic of' belong to microscopic interpretation, not to your dictation.
Apply this split as a rewriting filter when you study. If one draft option says 'grossly diagnostic of malignancy' and another says 'irregular firm white mass with central necrosis, 1.5 cm from the closest inked margin,' the second is the defensible professional statement because it describes without concluding — this is the concept of an objective gross description. Take any draft dictation, strike every interpretive phrase, and replace it with a measurable observation. That rewriting drill builds the habit faster than rereading definitions.
A Fixed Triage Order for Every Specimen You Meet
Use the same five-step sequence on every specimen: orient, ink, measure, sample in priority order, then dictate. A fixed order prevents small omissions such as forgotten orientation or an unrecorded container count.
Each step depends on the one before it. Orientation comes first because ink placement is meaningless until you know which surface is which — sutures, tags, and anatomical landmarks must be read and recorded before ink touches tissue. Measurements come before sectioning, because cutting destroys the intact dimensions you must report. Sampling follows a priority: the lesion together with its relationship to the nearest margin, then the remaining margins, then clinically named structures the requisition highlights, then representative normal tissue. Dictation comes last so it records what you actually did, not what you planned.
Apply the sequence to practice cases. When a written scenario presents a jumbled task list — a specimen arrives unoriented, the requisition notes a prior biopsy site, two containers sit unopened — the strongest plan is the one that resolves the information problems first: orientation, labels, and requisition details before any destructive step such as inking or sectioning. Practice by rewriting messy task lists into the five-step order until the ranking feels automatic rather than memorized.
Explore in 3D: Kidneys, Ureters and Bladder: The Urine Transport Pathway
This model shows five selectable structures: the right and left kidneys, the right and left ureters, and the urinary bladder. It demonstrates the gross pathway of urine transport from where urine forms (kidneys) to where it is stored (bladder). Note: the urethra and internal renal anatomy are not included in this model, so the pathway ends at the bladder.
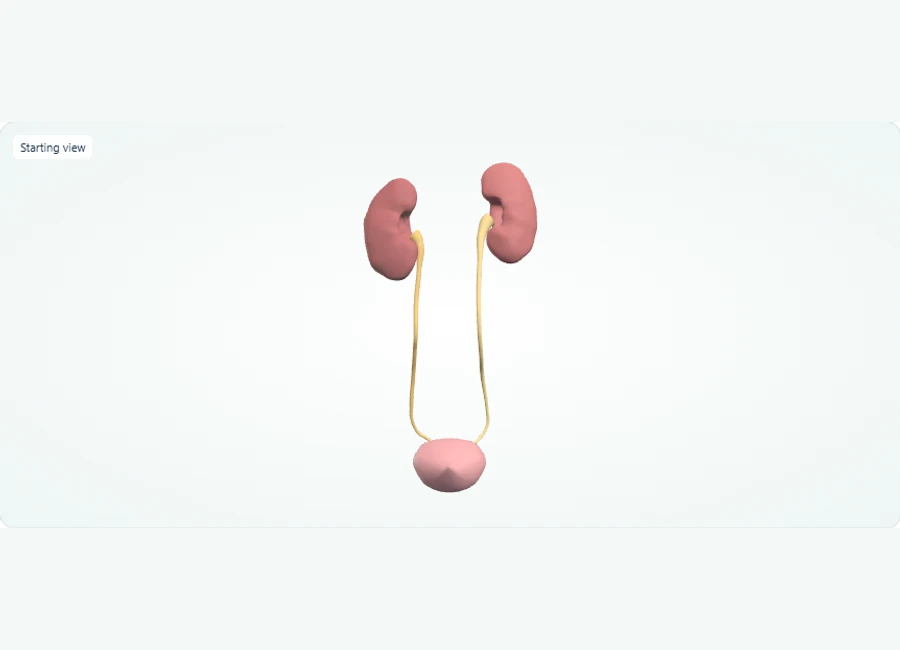
Rotate, isolate structures, and test your recall.
Choose Front. Select the right kidney, then its ureter, and follow the route toward the bladder with all structures visible.
Repeat on the left side. Select and hide each kidney separately if you want a clearer view of the ureters; use Show all to restore them.
Select the urinary bladder. Rotate the model and identify where the paired ureters meet the single bladder.
Try it yourself
Trace the three structures in the right-sided urine transport route shown here. What does the final structure do?
Show answer and explanation
Right kidney, right ureter, urinary bladder. The bladder stores urine until it leaves the body. (The left side follows the same pattern: left kidney and left ureter also deliver urine to the bladder.)
Urine flows from each kidney into its own ureter, which transports it down to the urinary bladder for storage. Both the right and left ureters empty into the single bladder. Because the urethra is absent from this model, the bladder is the terminal structure you can trace.
- Urine is formed in the kidneys; from each kidney, urine drains into that side's ureter (right ureter from right kidney, left ureter from left kidney).
- Each ureter carries urine downward to the urinary bladder, which stores urine until it is expelled; this model shows both ureters joining the bladder.
- This model is a gross transport overview only: the urethra and internal kidney structures are not shown, so urine flow beyond the bladder cannot be traced here.
Margin Inking Logic: Why Color Placement Decides the Answer
Margins are assessed per surface, not per specimen. Assign a distinct ink color to each anatomical surface, orient the specimen first, and submit sections perpendicular to the margin so every surface stays separately traceable.
On a paper breast lumpectomy case, orientation sutures mark the superior and lateral aspects. An illustrative institutional scheme might assign superior blue, inferior black, medial green, lateral yellow, anterior orange, and posterior red; actual color assignments vary by laboratory, so treat this as a worked example rather than a universal rule. The logic behind the colors is what matters: the pathologist can state which specific margin is involved only if each surface carries its own color, and sections cut perpendicular to the ink keep that margin relationship readable under the microscope.
Scenario: a trainee inks the entire specimen one color and submits only the center of the tumor, a plausible mistake because central sampling feels thorough. The better decision is to orient from the sutures, apply the distinct-color scheme to all six surfaces, and sample the tumor at its closest approach to the nearest inked surface plus representative sections of each remaining margin. Why it matters: one ink color collapses six separately reportable surfaces into a single uninterpretable mark, and central-only sampling cannot show how closely the lesion approaches any margin at all.
Autopsy Workflow: Authorization Scope and Named Evisceration Techniques
Autopsy practice is bounded by written authorization and documentation rules that surgical work does not carry. Know the named evisceration approaches and which tissues are retained fresh, for toxicology, or in fixative.
Authorization defines the permissible scope — full body versus limited regions — and the permitted uses of the examination, so identification and custody documentation precede every other step. The named evisceration techniques differ in what each exposes: Virchow removes organs individually, Ghon removes the thoracic contents as an en bloc unit, and Rokitansky dissects in situ. Choosing among them is anatomic reasoning applied to a clinical question, which is why the distinctions matter more than the names alone. Formulation of the cause of death rests with the supervising pathologist, not with the assistant.
Scenario: the written authorization covers the thorax only, but the clinical history makes the abdomen tempting. The plausible mistake is proceeding with a full evisceration because the abdominal findings 'might matter.' The better decision is to confirm the written scope, examine only the permitted regions, and document the restriction and any communication about it. Why it matters: exceeding authorized scope is a legal and ethical breach regardless of clinical curiosity, and a documented restriction protects the integrity of the case record and everyone who worked on it.
Dictation Discipline: Laterality, Section Keys, and Container Reconciliation
Reconcile container labels and the requisition before dictating, record laterality explicitly, and use a section key so every submitted piece maps to a numbered block a slide can be traced back to.
A section key — the block submission summary — ties each cassette to its content, and small specimens whose entire tissue matters are designated as submitted entirely (in toto) rather than sampled. Laterality and patient identifiers must match across the container, the requisition, and the dictation; any discrepancy stops work until resolved under policy. Even unremarkable structures get their weights and measurements recorded, because the gross record must stand on its own for a pathologist who never saw the intact specimen.
Scenario: a mastectomy container is labeled left, but your draft dictation says right because you copied the previous day's template. The plausible mistake is submitting the draft unchanged, trusting a template that felt familiar. The better decision is to reconcile all three identifiers before any sectioning, correct the dictation, and document the discrepancy per policy. Why it matters: a laterality error that survives into the permanent record can propagate into the surgical report and downstream care, and pre-sectioning reconciliation is the checkpoint designed to catch exactly this class of error.
A Sampling Decision Table for Routine Gross Findings
Turn recurring gross findings into conditional rules: what the finding is, what you do next, and why the action protects the record. The table below covers common routine situations in simplified form.
Treat the table as simplified teaching rules, not universal protocol. Real laboratories maintain written grossing manuals, and pathologist instructions override the defaults — an override written into a requisition changes the default action, and a sound plan must state the condition that triggers it. When you practice, state the rule and then state the condition that would change it. That two-step habit is what converts a memorized rule into judgment that transfers to unfamiliar case-analysis questions.
Extend the table yourself. For each specimen category you study, add rows for findings you meet in reading or supervised practice, and write one reason clause per row. A rule without a stated reason decays quickly, while a reasoned rule survives transfer to new scenarios. Aim for at least five rows per category before moving on to the next body system.
| Gross finding | Better next action | Why it matters |
|---|---|---|
| Tiny biopsy where all tissue is clinically relevant | Submit the tissue entirely, in toto, under a simple block key | Sampling cannot be corrected after the tissue is exhausted |
| Cyst with a thin wall and clear contents | Sample the wall in several areas and record the volume and character of the contents | The wall may harbor the lesion even when the contents appear unremarkable |
| Closest margin torn during specimen handling | Document the handling artifact and sample along the torn edge as inked | The pathologist must be able to distinguish artifact from true margin involvement |
| Requisition requests fresh tissue for special studies | Set aside the requested tissue before any fixative contact and document what was held | Fixation can compromise the downstream studies the request anticipated |
| Multiple containers arrive from one procedure | Reconcile every label against the requisition before any sectioning | Container-to-anatomy errors propagate into every later report |
Practice Exercise, Self-Check Rubric, and a Preparation Sequence
Write triage plans for five paper specimens, score them against the rubric below, then sequence your review by body system. Treat rubric scores as learning milestones, not passing predictions.
Choose five routine specimen types — for example colon, gallbladder, placenta, thyroid, and a skin excision — and for each write a triage plan in about ten minutes: the orientation clues you would look for, an ink scheme, a measurement list, a sampling priority, and a dictation skeleton. Compare each plan against any grossing protocol you can legitimately review in your training or workplace, and note every divergence. Expected observations: early plans will skip orientation reasoning, under-specify ink colors, or drift into interpretive language, and by the fifth plan those gaps should shrink visibly.
A workable sequence: first organize review by body system so anatomy and specimen handling reinforce each other; second, add autopsy topics — authorization, identification, named evisceration approaches, tissue retention categories — as their own block; third, run timed case-analysis scenarios weekly and score them with the rubric; fourth, close with dictation drills that strike interpretive language. Readiness checks: you can state the five-step triage order unprompted, explain the reason clause behind any table row, and complete a scenario plan inside your time target without skipping the reconciliation step. For eligibility, scheduling, and administrative requirements, rely on the issuer's own certification pages rather than secondary summaries.
- Plan states orientation evidence (sutures, tags, anatomical landmarks) before any inking step appears
- Each inked surface has a distinct color or an explicit reason no ink is needed
- Sampling list follows priority order: lesion-to-margin relationship, then remaining margins, then named structures, then representative tissue
- Dictation skeleton contains no interpretive language and reconciles container labels against the requisition
- Score 5 out of 5 on three consecutive plans before treating the skill as stable
References and further reading
Use these references to explore the concepts and check the latest information from the relevant organizations.