
Study the COA as a set of decision points, not isolated facts. For each skill, learn three things: the correct technique, what the result does and does not tell you, and what belongs in the chart. Work the two scenarios below (acuity with a pinhole decision, and an elevated tonometry reading) until you can state the mistake, the better choice, and the reason in your own words. Use the instrument comparison table to separate lensometry, keratometry, and refraction, then run the four-week sequence and readiness checks. Administrative details such as eligibility, scheduling, and fees live with the certifying body; see JCAHPO's site for current requirements. Self-check scores are learning milestones, not predictions of your result.
Building the COA Core Knowledge Map: How the Domains Connect
Organize COA content as a chain: history, then measurements, then interpretation and escalation, then documentation. Every domain feeds the next, so a gap in technique distorts everything downstream of it.
Start your map with the measurement cluster: visual acuity, tonometry, keratometry, lensometry, and basic refractive assessment. These skills share one structure. Each produces a number that is only meaningful alongside its method, the conditions of the measurement, and the patient's history. A pressure of 24 mmHg by applanation on a scarred cornea tells a different story than the same number from a routine screening, so the number alone is never the finding.
Build the second half of the map around judgment and communication: case analysis, ethics, safety, and documentation. Link each item backward to a measurement. For example, tie documentation standards directly to acuity and pressure records, and tie safety standards to the use of diagnostic drugs. When you review any topic, name the domain it belongs to and one neighboring domain it influences. This keeps your study from fragmenting into disconnected flashcard piles.
- Measurement cluster: acuity, tonometry, keratometry, lensometry, basic refraction
- Interpretation cluster: when to repeat, when to note a limitation, when to alert the doctor
- Professional cluster: documentation, ethics, infection control, diagnostic drug safety
Recording Visual Acuity: Notation, Pinhole Use, and What to Document
Acuity is a pair of facts: the measured level and the conditions under which it was measured. Decide deliberately whether a pinhole reading adds information, and record both values with the method used.
Learn the notations you will encounter and what each implies. Snellen notation expresses a fraction comparing the patient's performance to a standard testing distance; a recorded value should never be separated from the chart type and distance used. Know how to convert between expressions of the same measurement, such as moving a Snellen fraction into its decimal equivalent, and keep habitual versus best-corrected acuity clearly labeled. Mixing notation or omitting the correction status is the documentation equivalent of reporting a pressure without naming the technique.
Worked scenario: a patient reads the 20/70 line and stops. A plausible first move is to record 20/70 and move on. The better decision is to offer a pinhole occluder, record the unaided acuity and the pinhole acuity separately, and note any obstacle such as a small pupil or media opacity. Why it matters: if pinhole acuity improves markedly, the deficit is likely refractive in character; if it does not, the doctor is alerted earlier to a non-refractive cause. The chart now carries a decision, not just a number.
Explore in 3D: Right eye: layers, lens, and optic nerve
This model shows the right eye as five selectable parts: cornea, lens, retina, sclera, and optic nerve. The cornea and lens sit anteriorly, the retina lines the posterior interior, and the optic nerve exits posteriorly. Surfaces are opaque until hidden, so hiding the sclera is the key step to see inside.
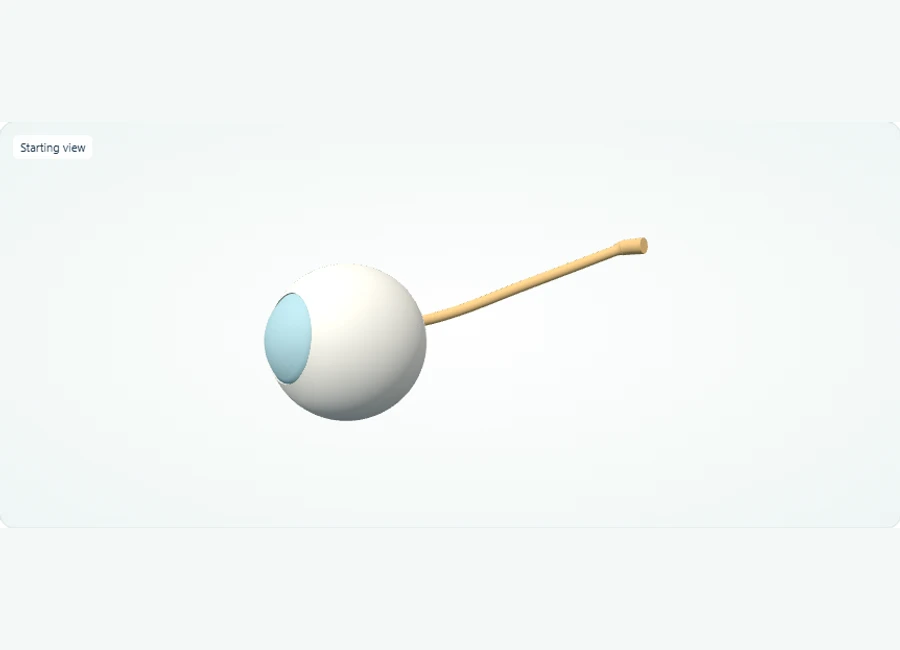
Rotate, isolate structures, and test your recall.
Select and isolate the right cornea, then the right lens, to inspect these anterior structures individually. The study model uses opaque surfaces.
Use Show all. Select and hide the sclera to expose deeper layers, then isolate the retina to inspect its shape.
Use Show all and choose Side or Back. Select the optic nerve to trace its exit from the posterior eye.
Try it yourself
Which structure exits the posterior eye, and which light-sensitive layer lines the posterior interior?
Show answer and explanation
The optic nerve (cranial nerve II) exits posteriorly; the retina lines the posterior interior.
From the back of the model, the nerve trunk is the structure leaving the eyeball, and the retinal lining sits within the posterior interior. Note the entire retina is shown as one part, and the macula is not separately labelled in this model.
- Refractive structures (cornea and lens) are anterior; the light-sensitive retina is posterior.
- The optic nerve (cranial nerve II) leaves the eye posteriorly, carrying visual information toward the brain.
- The sclera is the opaque outer coat; hide it to expose the cornea-lens axis and the internal retinal lining.
Tonometry Readings You Don't Trust: Technique Limits and Escalation
Every tonometry method has known sources of error. Learn each technique's limitations, follow the clinic's repeat protocol, document the method used, and escalate unexpected values rather than discarding them.
Contrast the main techniques by their failure modes. Applanation tonometry estimates pressure from the force needed to flatten a known corneal area, so corneal thickness, edema, scarring, or irregularity can distort the estimate. Noncontact tonometry avoids topical anesthesia and direct corneal contact but depends on correct alignment and patient cooperation. Neither method is interchangeable with the other for every eye, which is why the technique named in a scenario is part of the answer, not background detail.
Worked scenario: a screening noncontact reading returns a value well above the range the patient had at prior visits. A plausible mistake is to assume the machine misfired, retest until a lower number appears, and record only the low value. The better decision is to repeat per your clinic's written protocol, average or record values as the protocol directs, name the technique in the chart, and bring the unexpected value to the doctor's attention before the exam begins. Why it matters: discarding the higher reading removes exactly the information the doctor needs, and a chart that hides the disagreement between visits creates a false baseline.
Lensometry, Keratometry, and Refraction: Which Instrument Answers Which Question
These instruments are not interchangeable: lensometry reads a lens, keratometry measures corneal curvature, and refractive methods estimate the eye's correction. Naming the wrong instrument for a question signals a conceptual gap.
Fix the distinctions with the question each tool answers. Lensometry answers 'what does this spectacle lens contain?' — sphere, cylinder, axis, prism, and add power for a reading lens. Keratometry answers 'how steep or flat is the cornea in each principal meridian?' which feeds contact lens fitting and corneal assessment. Refraction, whether by retinoscopy, autorefraction, or subjective refinement, answers 'what correction would this eye need?' Confusing a lens measurement with a corneal measurement, or an objective estimate with a subjective final Rx, is the specific confusion to train out.
Use the table below as a drill cover: hide the rightmost columns, read the clinical question, and name the instrument before checking. Extend the drill by predicting the output of each instrument for a given case — for example, what lensometry returns for a progressive lens versus what keratometry returns for the same patient. If you can generate the expected output before measuring, you understand the instrument's role; if you cannot, that is the section to restudy.
A realistic mistake to catch in practice: recording a keratometry finding as part of the patient's prescription, or quoting an autorefraction printout as the final subjective refraction. Both errors blur the line between objective data and the corrected, verified result, and both are exactly the kind of conceptual slippage a scenario-based question can expose.
| Instrument / Method | Question It Answers | Typical Output | Common Mislabeling Error |
|---|---|---|---|
| Lensometry | What is in this spectacle lens? | Sphere, cylinder, axis, prism, add | Recording lens values as the eye's refraction |
| Keratometry | What is the corneal curvature in each meridian? | Dioptric power and axis of the two principal meridians | Treating corneal data as refractive data |
| Retinoscopy / Autorefraction | What correction does the eye objectively suggest? | An objective starting point for refraction | Presenting an objective estimate as the final Rx |
| Subjective refraction refinement | Which correction does the patient confirm? | Best-corrected prescription | Skipping verification against objective findings |
History and Pupillary Assessment: Turning Patient Answers into Usable Charts
A history is only useful when symptoms are recorded with onset, duration, and context, and pupillary findings are documented against their testing conditions — not as bare adjectives.
Train yourself to convert vague patient statements into structured data. 'My vision is blurry' becomes: which eye, both or one, constant or intermittent, distance or near, when it started, and what makes it better or worse. For systemic health, record conditions and medications relevant to eye care and to the safe use of diagnostic drugs. The exam's case-style scenarios reward the same structure: a well-formed history often contains the fact that changes the correct answer, and an unstructured one buries it.
For pupillary assessment, separate the observation from the interpretation. Record pupil size in each illumination condition, note equality, shape, and reactivity, and describe any afferent defect test result with the light conditions used. A chart entry reading 'pupils normal' cannot be compared to next week's entry; a chart entry with sizes, conditions, and technique can be. Apply the same discipline to confrontation fields and extraocular motility: state what you tested, how, and what you observed, so another reader can judge the reliability of the finding.
Diagnostic Drops and Safety: Screening Before Dilation
Instilling diagnostic drugs is a decision with preconditions: verify the agent's purpose, screen the history for relevant risks, confirm with the doctor when indicated, and document what you gave and when.
Learn the drug categories by action rather than by memorizing names in isolation: mydriatics that dilate the pupil, cycloplegics that also relax accommodation, and anesthetics used for procedures such as applanation. For each category, know the expected effect, the typical onset pattern, and the patient instructions that follow — including warning patients about light sensitivity and near blur after dilation. Recording drug, strength where applicable, time, and which eye is the documentation habit that makes the chart trustworthy.
Worked scenario: a patient reports a past diagnosis of narrow angles, and the day's workflow includes dilation. A plausible mistake is to proceed because dilation is routine. The better decision is to flag the history before instilling anything, confirm with the doctor whether dilation is appropriate for this patient today, and document both the flagged history and the outcome of that conversation. Why it matters: the assistant's screening role exists precisely for situations where routine and history conflict, and the chart must show the conflict was recognized rather than missed.
A Four-Week Preparation Sequence with Self-Check Rubric
Sequence preparation in four passes: map the domains, drill each measurement with real instruments, run case-based decision drills, then test yourself against a documentation rubric and a mixed review.
An adaptable sequence: Weeks one and two, build the domain map and pair every measurement skill with hands-on practice where equipment is available — acuity with pinhole decisions, lensometry on known trial lenses, keratometry on a training eye or cooperative colleague. Week three, shift to decision drills: write short clinic scenarios, state the repeat rule, the documentation content, and the escalation trigger for each. Week four, run mixed review across all domains and score yourself on the rubric below.
Practical exercise with expected observations: perform one complete intake sequence — history, acuity (unaided and pinhole), and pupillary assessment — on a consenting peer or training setup, then write the chart entry from memory. Include tonometry in the exercise only within a supervised training or clinical program where a qualified instructor directs the technique; do not practice corneal-contact tonometry independently on a peer. Expected self-checks: your entry names the chart type and distance for acuity, lists both acuity values with correction status, names the tonometry technique, records pupil sizes with illumination conditions, and contains no adjective-only findings. Score one point per item; a full score signals the documentation habit is in place, which is the milestone to reach before mixed review.
Readiness checks before you finish: you can state the question each instrument answers without notes; you can narrate both worked scenarios including the mistake and the better decision; you can list what must appear in the chart for any measurement you performed; and you can explain, in one sentence each, why screening precedes dilation and why a technique belongs beside its number. Any gap points you to a specific section, not to more general review.
- Weeks 1–2: domain map plus hands-on measurement practice with known reference targets
- Week 3: written decision drills — repeat rules, documentation content, escalation triggers
- Week 4: full intake simulation scored against the rubric, then mixed-domain review
- Rubric items: notation named, both acuities recorded, technique labeled, pupil sizes with conditions, no bare adjectives
References and further reading
Use these references to explore the concepts and check the latest information from the relevant organizations.