
This guide takes a case-integration angle: the CI credential's subject matter asks you to connect coronary imaging, hemodynamic waveforms, equipment behavior, and radiation management inside one clinical moment, so isolated fact drilling leaves visible gaps. The advice here is to study each domain through short paper scenarios that force you to justify a decision, then re-test yourself against a rubric. Work through the two worked scenarios, the imaging-mode comparison table, and the six-week sequence below, and use the readiness checks to decide when your review is complete.
What the CI Subject Adds Beyond Projection Radiography
The CI domain moves you from capturing a static image to steering a live procedure: real-time fluoroscopic guidance, catheter support, hemodynamic recording, and immediate decisions all happen in the same room and the same minute.
In projection radiography you control positioning and exposure, then evaluate a finished image. In the cardiac cath lab the image is a means to an end: live fluoroscopy and contrast injection help navigate catheters, confirm anatomy, and support interventions while physiologic monitors run in parallel. That changes what you must learn — not only anatomy and technique factors, but how each imaging choice alters what the procedure team can see and do next.
This integration is the concept-level difficulty of the subject. A fact such as which oblique projection isolates a given coronary segment only becomes usable when linked to why the operator needs that segment isolated at that step. Build study notes that pair each imaging fact with its procedural purpose and each physiologic measurement with the decision it informs. Domain knowledge, cardiac assessment, and applied practice stop being separate silos once you always attach the 'so that the team can…' clause.
Naming Coronary Projections: LAO, RAO, Cranial, and Caudal With Confidence
View names describe detector position relative to the patient: left or right anterior oblique for rotation, cranial or caudal for angulation. Learn the naming rule first, then attach each named view to the anatomy it separates.
The naming convention follows the detector. When the image receptor rotates toward the patient's left, the projection is LAO; toward the right, RAO. Angling the tube head toward the head gives cranial, toward the feet gives caudal. Drill the convention until naming is automatic, because reports and case discussions use these labels constantly, and misreading a label reverses your mental picture of the anatomy being discussed.
Then study why each angulation exists. Overlapping segments — for example the left anterior descending artery and its diagonal branches in a straight frontal view — can hide a lesion, so oblique and angled views are chosen to spread the vessels apart. In your notes, record for each named projection which vessel segment it isolates and which overlap it solves. A view learned without its purpose is fragile; a view learned as the solution to a specific overlap problem tends to stick.
Explore in 3D: Heart chambers and great vessels
A four-chambered heart viewed from the front. The right ventricle supplies the pulmonary circulation via the pulmonary trunk; the left ventricle supplies the systemic circulation via the ascending aorta. This model shows external chamber surfaces and the visible great vessels only — no internal valves or conduction system.
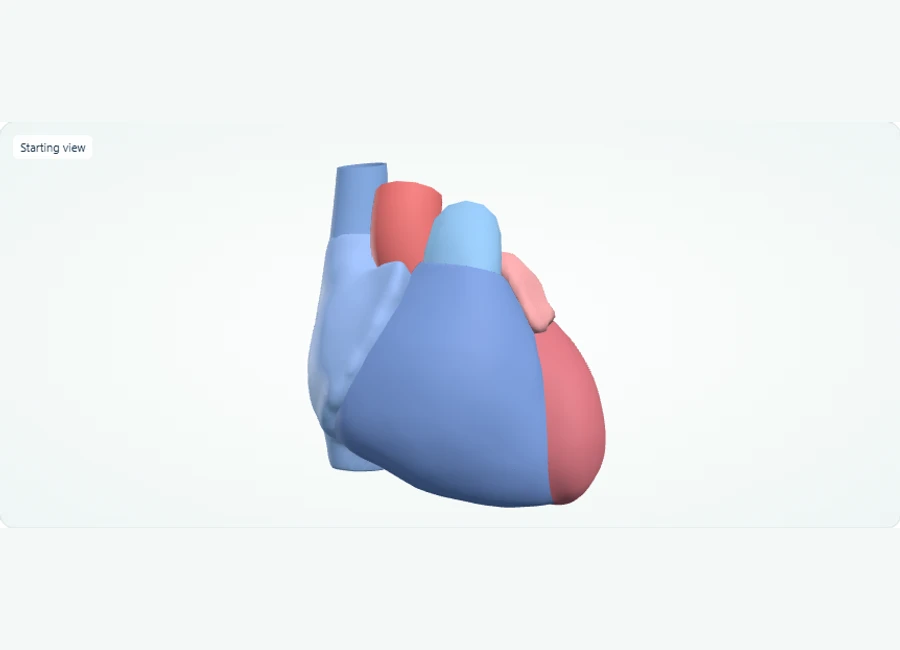
Rotate, isolate structures, and test your recall.
Choose Front and compare the four chambers. The right ventricle forms most of the anterior surface; the left ventricle contributes to the apex.
Select and isolate each chamber in turn, then use Show all to restore its relationship to the surrounding structures.
Select the pulmonary trunk and ascending aorta in turn. Name the circulation supplied by each, then use Test recall to practise identifying the listed structures.
Try it yourself
Which ventricle supplies the pulmonary trunk, and which supplies the ascending aorta?
Show answer and explanation
The right ventricle; it serves the pulmonary circulation.
On the front view, the right ventricle is the anterior-most chamber, and its outflow tract continues as the pulmonary trunk carrying blood to the lungs. The left ventricle instead empties into the ascending aorta for the systemic circulation.
- The right ventricle pumps blood into the pulmonary trunk toward the lungs; the left ventricle pumps into the ascending aorta to the body.
- The superior vena cava returns blood to the right atrium from above the heart.
- The two atria sit superior to the two ventricles; atria receive blood, ventricles eject it.
Visual anatomy review: Locate chambers and valves before interpreting the scenario
Place the right-heart sampling sites in anatomical sequence before comparing their oxygen saturations.
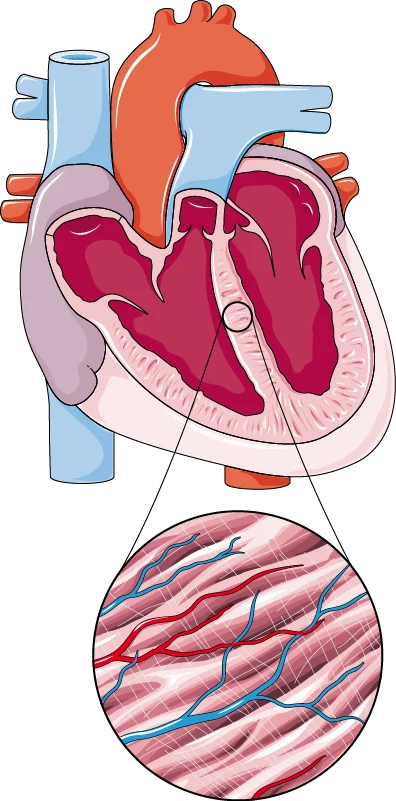
Normal heart anatomy with a cardiac muscle inset. In this frontal view, the right heart appears on the viewer’s left. The illustration does not show a patient’s device or abnormal flow.
Blood flows from the right atrium through the tricuspid valve to the right ventricle, then toward the lungs. Returning blood enters the left atrium and crosses the mitral valve into the left ventricle before entering the aorta.
In Z-Anatomy, locate the heart and rotate it to compare front and back views. Find the great vessels, then trace the pulmonary and systemic circuits aloud without relying on screen-left and screen-right.
Try it yourself
Name the valve between each atrium and its ventricle. Which ventricle sends blood into the pulmonary circulation?
Show answer and explanation
Right: tricuspid valve. Left: mitral valve. The right ventricle supplies the pulmonary circulation.
Use the chamber names, not their position on the screen, to distinguish right from left. The diagram provides anatomy; pressure, flow and device findings must come from the scenario.
Pressure Waveforms: Reading Tracing Shape Before Trusting the Number
Hemodynamic data is evidence about the cardiovascular system filtered through equipment. A tracing's shape tells you whether the measurement is trustworthy; the number only means something once the waveform looks physiologic.
Learn these named patterns as diagnostic categories, not vocabulary. Each shape carries information about the measurement system as well as the patient: a damped appearance points toward catheter position or the fluid-filled system, while ventricularization during selective engagement signals that the catheter pressure is no longer behaving like a clean coronary pressure. Shape-first reading gives you a fast validity check before any value enters the record.
Worked scenario: during selective coronary engagement, the monitor shows a rounded upstroke with the dicrotic notch gone and the value drifting lower. The tempting move is to record the displayed pressure and move on. The better decision is to treat the shape change as position or equipment information first — the catheter may be wedged or against the vessel wall, or air may be in the system — then disengage, flush, and re-record. Why it matters: documented pressures feed directly into assessment of a narrowing, so a damped tracing recorded as fact can misrepresent the patient's hemodynamics on the permanent record itself.
- Normal arterial tracing: rapid systolic upstroke with a clear dicrotic notch
- Damped tracing: rounded peaks, blunted detail, lost notch
- Ventricularization: the selective coronary tracing takes on a chamber-like shape
- Pullback gradient: paired pressures across a narrowing, interpretable only when both tracings are clean
Radiation Dose in the Cath Lab: Tracking Metrics, Not Just Minutes
Fluoroscopy time is a duration, not a dose. Dose-oriented metrics such as dose-area product and estimated peak skin dose, together with acquisition settings, describe patient exposure far more faithfully than elapsed time alone.
Patient dose in interventional work is commonly tracked with dose-area product — absorbed dose weighted by the exposed tissue area — and with estimates of peak skin dose, the highest dose delivered to any single skin site. In typical modern system configurations, cine acquisition runs deliver more dose per second than low-rate pulsed fluoroscopy, so a case can accumulate substantial dose while fluoroscopy time stays modest. Learning what each displayed metric represents lets you respond to the right signal during a case.
Worked scenario: late in a long case, the fluoroscopy time looks unremarkable and the team is tempted to continue unchanged. The better decision is to check the cumulative dose-area product and any skin-dose estimate, recognize that acquisition runs have been numerous, then tighten collimation, keep the detector close to the patient, minimize run length and count, and consider adjusting angulation to spread skin entry across sites. Why it matters: deterministic skin effects relate to peak absorbed dose at a location, so managing metrics and technique — not the clock — is what actually reduces that risk.
Imaging Modes Side by Side: Fluoroscopy, Cine, DSA, and Roadmap
Each mode answers a different procedural question. Comparing their purposes, dose characteristics, and operator controls in one table turns mode selection into a rehearsed decision instead of a memorized habit.
Fluoroscopy exists for live guidance, cine for recorded documentation and measurement, digital subtraction angiography for vessel detail with background structures removed, and roadmapping for navigating devices along a previously opacified vessel path. Because the modes differ in both function and dose behavior, choosing among them is a judgment call that depends on what the current step of the procedure requires.
Use the table as a rehearsal prompt: cover the 'primary procedural role' column, read each row's controls, and state aloud which procedural step would call for that mode. Then add your own column listing one dose-reduction measure per mode. Covering, predicting, and checking converts a static comparison into a decision drill you can repeat in a few minutes each study day.
| Mode | Primary procedural role | Dose character | Key operator controls |
|---|---|---|---|
| Fluoroscopy | Real-time catheter and device guidance | Low-dose pulsed exposure in common setups | Pulse rate, collimation, detector-to-patient distance |
| Cine acquisition | Recorded angiographic documentation and measurement | Higher dose per second than pulsed fluoroscopy in typical configurations | Run length, frame rate, number of runs |
| Digital subtraction angiography | Vessel detail with background structures removed | Sensitive to motion between mask and fill images | Mask timing, injection coordination, subtraction settings |
| Roadmap | Overlay guidance for wires and catheters | Dose depends on refresh needs and fluoroscopy use | Refresh rate, overlay persistence, motion control |
An Integrated Case-Card Drill With a Self-Check Rubric
Build one-page paper cases that force cross-domain answers: anticipated projections, waveforms you would record, a dose-control plan, and documentation entries. Score yourself against a rubric to find which domain lags.
Exercise: write a short paper case — a patient scheduled for diagnostic coronary angiography, with described anatomy and no device data given. On one page, answer four prompts: which named projections you would anticipate and why; which pressure tracings you would expect and what shape confirms each is valid; your dose-management plan naming two metrics and two matched controls; and the procedure-documentation entries you would complete. Answering all four on one page is what makes the drill integrated rather than four separate quizzes.
Score each prompt from 0 to 2, where two points requires a justification, not just a name. Expected observations: every projection is tied to a vessel segment and the overlap it solves; tracings are described by shape before value; dose-area product and peak skin dose are named with a control matched to each; and the documentation list includes contrast and radiation data. Treat these as learning milestones, not a prediction of exam performance — repeated rubric scores of 6/8 or better tell you which domain to revisit.
A Six-Week Sequence and Concrete Readiness Checks
Sequence the work so single-domain fluency comes before integration: anatomy and view naming first, then waveforms, then dose and equipment, then combined cases, and finally a targeted review of your weakest drill scores.
A workable, adaptable sequence: weeks one and two, coronary anatomy with daily view-naming drills against your 'purpose per projection' notes; weeks three and four, waveform flashcards built from the named patterns above, adding one damped-tracing case; week five, dose metrics and imaging-mode controls using the table drill; week six, one integrated case card daily. Compress or stretch the phases to fit your calendar — the ordering, not the dates, is what builds cumulative understanding.
Readiness checks you can actually observe: explain any named projection aloud, from the naming rule to the overlap it solves, without notes; read a hand-drawn tracing and state shape first, value second; complete a case card at rubric level 6/8 or better twice in a row; and recite two dose metrics with a matched control for each. If any check fails, return to that section's drill rather than rereading passively — the drills, not the notes, are your practice surface. One short administrative note: confirm eligibility and examination logistics on the issuer's official credential page rather than from secondary summaries.
References and further reading
Use these references to explore the concepts and check the latest information from the relevant organizations.