
Use this guide to train complication discrimination, not just recall. The clinical difficulty this guide targets is that early orthopaedic emergencies share surface features with ordinary recovery: disproportionate pain can look like poor analgesia, post-fracture hypoxia can look like anxiety, and normal pulses can sit alongside a time-sensitive pressure problem. Work through each comparison, then the scenarios, then score yourself against the rubric in the final section before attempting timed practice sets. Administrative details such as eligibility and scheduling belong to the certification board; this guide concentrates entirely on clinical reasoning and study structure.
Compartment Syndrome Versus Expected Post-Operative Pain: Why 'Unrelieved Pain' Needs a Different Response
The distinguishing skill is treating pain out of proportion, pain on passive stretch, and paresthesia as a pattern requiring escalation, while expected post-operative pain improves with positioning and analgesia. Compare these two presentations explicitly when you study.
Start by naming the mechanism differences. Compartment syndrome is a pressure problem inside a fascial compartment, so it produces pain qualities that analgesia does not fully resolve: deep, unremitting pain worsened by passive stretching of the involved muscles, plus early paresthesia. Expected post-surgical or fracture pain is mechanically driven and responds, at least partially, to repositioning, immobilization support, and ordered analgesia. Build a two-column comparison sheet of these presentations and quiz yourself on which findings appear in each.
A second comparison to master is early versus late findings. Early changes involve sensation and pain behavior while pulses and limb color can still be normal; pallor, pulselessness, and paralysis are late and often signal established tissue injury. This is the trap built into the content itself: a normal pulse does not rule out the diagnosis. Practice reading stems that mention a strong distal pulse alongside severe pain and asking yourself whether the pulse finding changes your interpretation — it should not downgrade your concern.
- Pain out of proportion to injury or procedure, unrelieved by ordered analgesia: treat as a red flag, not a charting task.
- Pain on passive stretch of involved muscles: an early, high-value finding to document verbatim.
- Paresthesia or diminished sensation distal to the injury: distinguish from localized incisional numbness.
- Normal pulses, normal color, warm extremity: do not use these to dismiss the pattern above.
- Palpable tenseness or fullness of the compartment: compare with the uninjured limb rather than assessing in isolation.
Neurovascular Assessment You Can Trend: The Six Ps, Sequenced and Documented
Study the six Ps in a fixed sequence and, more importantly, as a trend over time. A single assessment is only a snapshot; the clinical skill lies in identifying change between assessments and documenting comparisons to the baseline or contralateral limb.
Fix your sequence: pain, pallor, pulselessness, paresthesia, paralysis, pressure (poikilothermia is sometimes added). Sequence matters because it forces you to check sensation and motor function before you are distracted by circulatory findings, and it makes your documentation consistent enough to compare shift to shift. When you practice, write out each assessment in the same order and include explicit comparisons — 'sensation intact compared with admission baseline' is stronger than 'sensation intact.'
Then train the trending habit, because change over time is what makes these findings clinically decisive. A patient whose paresthesia has progressed from the fingertips to the whole hand between checks presents differently from a patient with stable findings, even if both 'have paresthesia.' When you work through case material, scan for time markers and prior assessment data before forming an interpretation. In your own notes, rehearse writing a two-sentence escalation message: what changed, what you are concerned about, and what you are requesting.
Explore in 3D: Right Femur: Orientation and Key Ends
The femur is the thigh bone. This model shows one whole bone, the right femur, as a single selectable structure. You can identify side and ends by checking that the head faces medially at the proximal end, while the distal end helps form the knee.
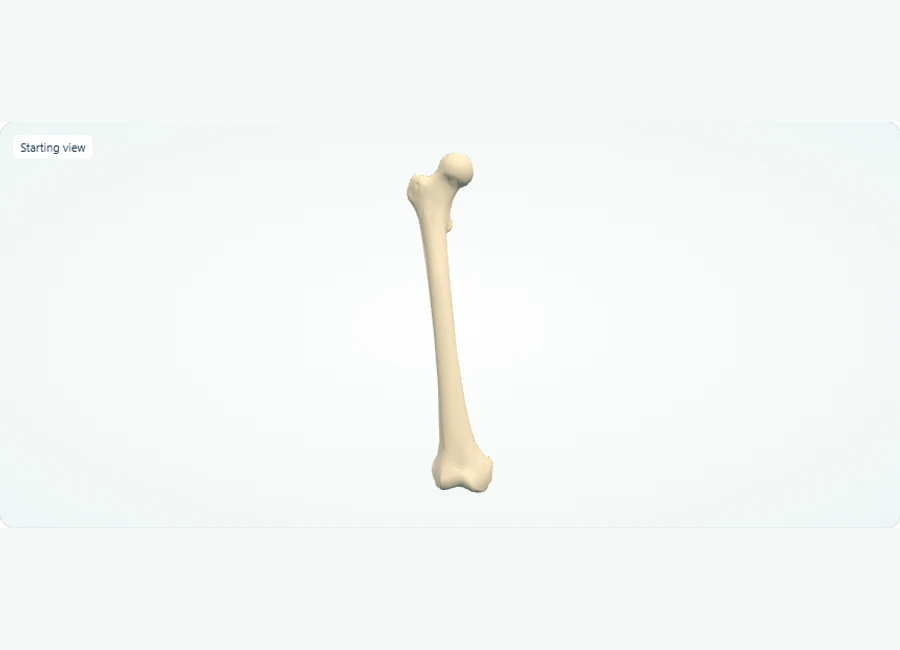
Rotate, isolate structures, and test your recall.
Locate the rounded head at the proximal end. In the body, this head faces medially toward the midline.
Switch between Front and Back to compare the proximal head with the broader distal end at the knee.
Zoom and rotate to review the ends again. Only the whole bone is selectable; individual landmarks do not have separate labels.
Try it yourself
Which end of the femur has the rounded head, and does that head face toward or away from the body’s midline?
Show answer and explanation
The proximal end has the rounded head. It faces medially, toward the body’s midline.
The femoral head is proximal, at the hip. The broader distal end contributes to the knee. Use anatomical directions relative to the body; screen directions change when the model is rotated.
- The femur lies in the thigh and is the single bone of that region.
- The head faces medially at the proximal end; use this to tell anatomical right from left on screen.
- The distal end of the femur contributes to the knee joint.
Worked Scenario One: Escalating Pain After Fixation Surgery
A plausible mistake is documenting unrelieved pain as a medication issue and re-dosing analgesia without a focused neurovascular recheck. The better decision couples the pain report with objective findings and escalates as a suspected compartment syndrome.
The scenario: after lower-leg fixation surgery, a patient reports pain rated far above their earlier post-operative baseline, describes it as unrelieved despite ordered analgesia, and reports the toes feeling 'tingly.' Pulses are palpable, the foot is warm and pink. A plausible mistake here is charting 'pain difficult to control, additional analgesia given, will continue to monitor' and moving on. That mistake happens because the visible findings look reassuring and pain management feels like a complete response.
The better decision: perform an immediate focused neurovascular assessment, elicit passive stretch of the affected compartment, compare sensation with the contralateral limb, and report the constellation — disproportionate pain, paresthesia, pain on passive stretch — using those terms. Why it matters: the diagnosis window is time-sensitive, and the reassuring findings (warm, pink, palpable pulses) are compatible with early compartment syndrome precisely because circulatory collapse is a late sign. Practicing this scenario trains you to escalate on the pattern rather than waiting for the dramatic findings that arrive too late.
Fat Embolism Versus Pulmonary Embolism After Femur Fracture: Comparison and Worked Scenario
Study the discriminating features — fat embolism syndrome's triad of respiratory insufficiency, neurologic changes, and petechial rash after long-bone injury, versus PE's risk profile — then apply them to a scenario where hypoxia is mistaken for anxiety.
Build the comparison deliberately. Fat embolism syndrome is associated with long-bone and pelvic fractures and classically combines respiratory compromise, altered mental status, and petechiae over the chest, axillae, or neck. Pulmonary embolism presents with respiratory distress, pleuritic pain, and hypoxia but not the petechial rash, and its risk profile centers on immobility, venous injury, and hypercoagulability rather than the fracture pattern itself. Your study sheet should force you to name which single finding best discriminates the two in a given case. Now apply it: one to two days after a closed femur fracture, a patient becomes acutely short of breath, hypoxic, confused, and restless, with unchanged limb neurovascular status. A plausible mistake is framing this as anxiety or inadequate pain control, offering reassurance, and documenting a behavioral concern — an error driven by agitation looking like discomfort and by the normal limb assessment falsely suggesting the fracture is not involved.
The better decision connects the fracture context with the respiratory and neurologic changes: inspect the chest and axillae for petechiae, position and support oxygenation per orders, and escalate with the full picture rather than a single symptom. In both emergencies oxygenation and prompt notification come first, but the supporting assessment differs — skin inspection and mentation trend for suspected fat embolism, risk-factor review for suspected PE. Train yourself to ask, for every acute respiratory case after fracture, 'what in this patient's orthopaedic picture changes my differential?' The triad exists precisely so that no single finding carries the diagnosis; missing the skin findings and the mentation trend leaves you treating a systemic process as a mood problem. Rehearse saying the linkage — fracture, lungs, brain, rash — out loud until it is automatic.
Fixation, Traction, and External Devices: Comparing Care Priorities Instead of Memorizing Device Lists
Study fixation methods as a decision table: what the device does, what complication each makes most relevant, and which assessments follow. Comparing internal fixation, external fixation, and traction by purpose and risk beats memorizing isolated care tasks per device.
Internal fixation implants hold fragments in place internally, so assessment centers on the surgical site, neurovascular status of the limb, and signs of infection or hardware problems over time. External fixation holds fragments via an external frame with percutaneous pins, which shifts attention to pin-site care and inspection for loosening or infection at the pin tracts. Skeletal traction applies continuous force through a pin, adding attention to alignment, weights hanging freely, and the traction setup itself. The point of the comparison is that each device changes which assessment deserves your closest scrutiny.
Convert the comparison into drills. Take a case describing a device plus one abnormal finding — a loose pin, a weight resting on the floor, increasing drainage at a surgical site — and state the priority assessment and the correct action direction before looking at answer choices. Device knowledge also connects naturally to patient-teaching and safe-transfer decisions, because each setup changes what mobility and weight-bearing are appropriate. If you can articulate why the device changes the risk, you can answer variants you have never seen.
| Approach | Primary purpose | Assessment focus | Complication emphasis |
|---|---|---|---|
| Internal fixation (ORIF) | Stabilize fragments with internal implants | Surgical site, limb neurovascular status, pain trend | Infection, hardware problems, impaired healing |
| External fixation | Stabilize via external frame and percutaneous pins | Pin sites, frame stability, limb alignment | Pin-site infection, loosening |
| Skeletal traction | Continuous force through a pin for alignment | Alignment, weights and setup, neurovascular status | Setup compromise, pressure injury, complications of immobility |
| Spinal/cervical immobilization contexts | Protect alignment during healing or transport | Neurologic checks, skin under devices, log-roll technique | Neurologic change, pressure injury |
Documentation, Ethics, and Safety in Orthopaedic Nursing: Turning Assessment Into Accountability
Study how findings become defensible documentation and safe decisions: objective language, comparisons to baseline, timely escalation, and safety choices such as mobility support and fall-risk management grounded in each patient's device and weight-bearing status.
Documentation in orthopaedic care earns its difficulty from trending: a note is most useful when it names what was compared and what changed. Practice rewriting vague charting — 'neurovascular intact, patient comfortable' — into objective statements that include sensation comparison, pain behavior, and any red-flag findings quoted in the patient's words. Also rehearse escalation documentation: what you reported, to whom, and what response followed. An objective, specific note is the one that supports a safe handoff, and recognizing that distinction is itself a study target.
Ethics and safety content ties to everyday orthopaedic decisions: respecting a patient's pain report while assessing it objectively, supporting mobility within prescribed weight-bearing limits, and managing fall risk without resorting to restrictions that undermine rehabilitation goals. When you study these items, frame each as a balancing decision — autonomy, safety, and recovery — and identify what information in the case should drive the choice. This keeps ethics questions from feeling like opinion and grounds them in assessment data.
A Realistic Preparation Sequence and Readiness Rubric for ONC Review
Sequence your preparation in four phases: concept comparison sheets, device and assessment drills, scenario practice with written rationales, then timed mixed sets with error review. Score yourself against the rubric below before considering each phase complete.
Phase one, build comparison sheets for the complication pairs in this guide and for fixation approaches; quiz yourself until you can state discriminating findings without notes. Phase two, drill the six-P sequence and practice writing two-sentence escalation messages for each red-flag pattern. Phase three, work exam-style scenarios in writing: state your interpretation, the plausible wrong reading, and the better decision before checking answers, so your rationale-repair happens on paper rather than in your head. Phase four, shift to timed mixed practice using the linked free practice set, and log every miss by concept, not by question number.
Use the following rubric as a milestone check, not a prediction of your exam result. A useful exercise: after each timed set, audit ten consecutive questions involving neurovascular or complication-discrimination content and score each of the four rubric lines as met, partly met, or not met. Repeat weekly; readiness to move forward is when all four lines are consistently met across two consecutive audits.
- Rubric line 1 — Pattern recognition: can you name the discriminating finding for each complication pair without notes?
- Rubric line 2 — Trending: do you consistently check cases for time markers and prior assessment data before answering?
- Rubric line 3 — Escalation language: can you write a two-sentence objective escalation message for each red-flag pattern?
- Rubric line 4 — Device-to-risk linkage: for each fixation or traction setup, can you state which complication the device makes most relevant?
- Adaptable schedule: comparison sheets first week, assessment and documentation drills second, written scenario rationales third, timed mixed sets thereafter with weekly rubric audits.
References and further reading
Use these references to explore the concepts and check the latest information from the relevant organizations.